2023. 1. 15. 21:50ㆍ개발 잡부/Chrome Extension
우선 CRA 없이 제로 베이스에서 해보기로 했다.
프로젝트 생성
weekly-pang
ㄴ node_modules
ㄴ public
   ㄴ index.html
ㄴ src
   ㄴ index.js
ㄴ package-lock.json
ㄴ package.json
ㄴ webpack.config.js
프로젝트 하이어라키는 다음과 같다.
mkdir weekly-pang
cd weekly-pang
npm init

// 기타 파일 생성은 알아서...
웹팩 설정
우선 src/index.js 파일을 생성한다.
// index.js

const a = ["a"];

console.log(a);webpack.config.js를 생성해준다.
// webpack.config.js

const path = require("path");

module.exports = {
  entry: "./src/index.js",
  output: {
    filename: "main.js",
    path: path.resolve(__dirname, "dist"),
  },
};
그 다음, webpack을 설치해준다.
npm i webpack webpack-cli -Dwebpack을 실행한다.
npx webpack결과물
// dist.main.js

console.log(["a"]);
webpack 추가 설정 (css, ts, react, svg)
우선 테스트를 위해 src/index.js를 src/index.tsx로 바꾼다.
(본인이 타입 스크립트를 안 쓴다면 바꿀 필요는 없다)
// src/index.tsx

import React from "react";
import ReactDOM from "react-dom/client";
import "./index.css";
import logo from "./logo.svg";

const rootElement = document.getElementById("root");

if (!rootElement) throw new Error("Failed to find the root element");

const root = ReactDOM.createRoot(rootElement);

root.render(
  <React.StrictMode>
    <div className="App">
      <header className="App-header">
        <img src={logo} className="App-logo" alt="logo" />
      </header>
    </div>
  </React.StrictMode>
);
추가적으로 svg를 해석할 수 있는 타입을 선언해준다. (custom.d.ts)
declare module "*.svg" {
  const content: string;
  export default content;
}
svg파일을 string 타입으로 해석할수 있도록 해줬다.
테스트를 위해 index.css와 logo.svg를 src폴더에 만들어준다.
index.html은 public폴더에 만들어준다.
(아무 svg를 써도 좋다)
// src/index.css

body {
  margin: 0;
  font-family: -apple-system, BlinkMacSystemFont, "Segoe UI", "Roboto", "Oxygen",
    "Ubuntu", "Cantarell", "Fira Sans", "Droid Sans", "Helvetica Neue",
    sans-serif;
  -webkit-font-smoothing: antialiased;
  -moz-osx-font-smoothing: grayscale;
}

code {
  font-family: source-code-pro, Menlo, Monaco, Consolas, "Courier New",
    monospace;
}

.App {
  text-align: center;
}

.App-logo {
  height: 40vmin;
  pointer-events: none;
}

@media (prefers-reduced-motion: no-preference) {
  .App-logo {
    animation: App-logo-spin infinite 20s linear;
  }
}

.App-header {
  background-color: #282c34;
  min-height: 100vh;
  display: flex;
  flex-direction: column;
  align-items: center;
  justify-content: center;
  font-size: calc(10px + 2vmin);
  color: white;
}

@keyframes App-logo-spin {
  from {
    transform: rotate(0deg);
  }
  to {
    transform: rotate(360deg);
  }
}
// public/index.html
<!DOCTYPE html>
<html lang="en">
<head>
<meta charset="utf-8" />
<link rel="icon" href="%PUBLIC_URL%/favicon.ico" />
<meta name="viewport" content="width=device-width, initial-scale=1" />
<meta name="theme-color" content="#000000" />
<meta
name="description"
content="Web site created using create-react-app"
/>
<title>Weekly pang</title>
</head>
<body>
<noscript>You need to enable JavaScript to run this app.</noscript>
<div id="root"></div>
<script src="main.js"></script>
</body>
</html>그 다음으로 할 일은 webpack 로더를 설치하는 것이다.
로더란, 특정한 파일 형식을 해석하기 위한 일종의 파일 해석 외주(또는 아웃소싱)와 같다고 보면 된다.
예를 들어 js밖에 모르는 웹팩이 svg를 해석하기 위해 file-loader에 외주를 주는 것이다.
npm i css-loader file-loader style-loader @swc/core swc-loader -D다음은, 리액트를 설치해준다.
npm i react react-dom
npm i @types/react @types/react-dom -D
다음은 로더가 준비되었으니 webpack을 설정해주면 된다.
// webpack.config.js

const path = require("path");

module.exports = {
  entry: "./src/index.tsx",
  output: {
    filename: "main.js",
    path: path.resolve(__dirname, "dist"),
  },
  mode: "production",
  module: {
    rules: [
      {
        test: /\.(js|jsx|ts|tsx)$/,
        exclude: /(node_modules)/,
        use: {
          loader: "swc-loader",
          options: {
            jsc: {
              transform: {
                react: {
                  runtime: "automatic",
                },
              },
            },
          },
        },
      },
      {
        test: /\.css$/i,
        use: ["style-loader", "css-loader"],
      },
      {
        test: /\.(png|svg)$/,
        use: [
          {
            loader: "file-loader",
            options: {
              name: "images/[name].[ext]?[hash]",
            },
          },
        ],
      },
    ],
  },
  resolve: {
    extensions: ["ts", "tsx", "js", "jsx", "json"],
  },
};typescript니까 tsconfig.json도 추가해준다.
// tsconfig.json

{
  "compilerOptions": {
    "target": "es5",
    "lib": ["dom", "dom.iterable", "esnext"],
    "allowJs": true,
    "skipLibCheck": true,
    "strict": true,
    "forceConsistentCasingInFileNames": true,
    "noEmit": true,
    "esModuleInterop": true,
    "module": "esnext",
    "moduleResolution": "node",
    "resolveJsonModule": true,
    "isolatedModules": true,
    "jsx": "preserve",
    "incremental": true,
    "baseUrl": ".",
    "paths": {
      "@/*": ["./*"]
    }
  },
  "include": ["next-env.d.ts", "**/*.ts", "**/*.tsx"],
  "exclude": ["node_modules"]
}
그 다음 webpack으로 번들링해준다.
npx webpack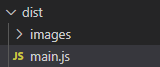
요런 결과물이 나온다.
Script 만들기
자, 결국 웹페이지는 index.html이 있어야한다.
하지만 현재는 dist폴더에 index.html이 없기 때문에,
빌드할 때마다 public/index.html을 dist/index.html로 복사해야한다.
package.json을 수정하자.
{
  ...

  "scripts": {
    "build": "npx webpack && cp public/index.html dist/index.html",
    "test": "echo \"Error: no test specified\" && exit 1"
  },

  ...
}
build 스크립트를 실행해보자.
npm run build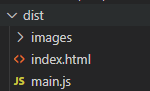
결과물
dist/index.html을 열어보자.
크롬에 드래그해도 좋고, 더블클릭해도 된다.

본인이 넣은 logo.svg가 돌고있으면 굿.
chrome extension 설정
열심히 빌드를 하다보니 내가 chrome extension설정을 하는지 까먹었다.
manifest.json을 만들어주자.
// public/manifest.json

{
  "name": "Weekly Stamp",
  "description": "매일매일 도장을 찍어보세요!",
  "version": "1.0",
  "manifest_version": 3,
  "chrome_url_overrides": {
    "newtab": "index.html"
  },
  "action": {
    "default_title": "주간 도장 팡팡",
    "default_popup": "index.html"
  }
}
새 탭이 열리면 우리가 만든 index.html이 열리도록 했다.
이 친구도 마찬가지로 public에서 dist로 옮겨주도록 한다.
package.json을 수정해주자.
// package.json

{
  ...

  "scripts": {
    "build": "npx webpack && cp -a public/. dist",
    "test": "echo \"Error: no test specified\" && exit 1"
  },

  ...
}
다시 빌드 프로세스를 거쳐준다.
npm run build이제 이 폴더를 크롬 익스텐션에 올려주자.
chrome://extensions/
주소창에 위 주소를 넣고 들어간다.
개발자 모드를 켜고, 압축해제된 확장 프로그램을 설치합니다를 누른다.
이후에는 dist 폴더를 선택해준다.
새 탭을 열면 아래와 같이 우리가 만든 페이지가 보인다.

'개발 잡부 > Chrome Extension' 카테고리의 다른 글
| Chrome.storage + Jotai 세팅하기 (0) | 2023.01.25 |
|---|---|
| chrome에 빨간줄 뜰 때 해결 방법 (0) | 2023.01.25 |
| 크롬 익스텐션 생성에서 실행까지 (0) | 2021.11.12 |
| React에서 Chrome API를 사용해보자. (with chrome.storage) (0) | 2021.08.19 |
| Chrome Extension에 React 적용하기 (0) | 2021.08.18 |