2021. 11. 26. 18:10ㆍ프론트엔드/React.js
이제 이전 포스트에서 알 수 있듯 개념은 대충 알았다.
하지만 실전은 항상 어려운 법이지.
어려우면 뭐다? 안 어려울때까지 구르면 된다.
이전 포스팅에서 Redux템플릿으로 생성을 했더니 카운터 예제가 완성이 되어 있었다.
그래서 코드를 읽어봤자 감이 안 올거 같아서 비슷한 예제를 하나 만들기로 했다.
오늘의 프로젝트
TypeScript + Redux로 세팅한
로스트아크 돌깎깎
크롬 확장 프로그램 - 로아 돌깎깎
스토어 링크 로아 돌깎깎 로스트 아크 어빌리티 스톤을 깎아보세요! chrome.google.com 깃허브 링크 GitHub - ImInnocent/lost-ark-stone: 로스트 아크 돌깎기 로스트 아크 돌깎기. Contribute to ImInnocent/los..
goldfishdiary.tistory.com
UI는 들어내고, 최소한의 기능만으로 세팅해볼 생각이다.
- 성공시 확률 10%감소, 실패시 확률 10% 상승
- 최대 10번까지 가능
- 리셋 기능
- 단일 항목 (1줄)
프로젝트 생성, 세팅
npx create-react-app redux-lost-ark우선 템플릿 없이 리액트 앱을 설치했다.
이제 TypeScript를 설치한다.
npm install typescript tsc
// 또는
yarn add typescript tsc
이제 Redux를 설치한다.
npm install @reduxjs/toolkit react-redux
// 또는
yarn add @reduxjs/toolkit react-redux
작업트리 세팅
Redux Essentials, Part 2: Redux App Structure | Redux
The official Redux Essentials tutorial: learn the structure of a typical React + Redux app
redux.js.org
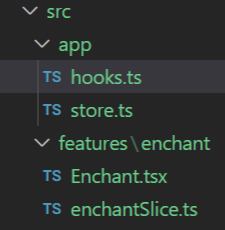
다음을 참고하여 작업트리를 설정해주도록 하자.
- app폴더에 store.ts와 hooks.ts를 생성한다.
- features 폴더에 enchant 폴더를 생성한다.
- enchant 폴더에 Enchant.ts와 enchantSlice.ts를 생성한다.

저장소(Store) 생성
import { configureStore } from '@reduxjs/toolkit';
import enchantReducer from '../features/enchant/enchantSlice';

const store = configureStore({
  reducer: {
    enchant: enchantReducer,
  },
});

export default store;

// Infer the `RootState` and `AppDispatch` types from the store itself
export type RootState = ReturnType<typeof store.getState>;
export type AppDispatch = typeof store.dispatch;src/app/store.ts에 다음과 같이 작성한다.
설명을 하자면 enchant에 해당하는 리듀서를 포함하는 저장소를 만들었다.
만약 다른 리듀서(슬라이스)를 추가하고 싶다면, enchant: enchantReducer 아랫줄에 추가하면 된다.
아마 두번째 줄에 에러가 날 것이다.
왜냐하면 아직 enchantSlice가 무언가를 export하지 않기 때문이다. (모듈이 아니라는 에러가 뜰 것)
TypeScript 세팅은 아래의 페이지를 참고했다.
TypeScript Quick Start | Redux
- How to set up and use Redux Toolkit and React-Redux with TypeScript
redux.js.org
리듀서는 '순수'해야한다.
간단한 프로젝트 주제라고 생각했는데, 생각보다 복잡한 문제가 생겼다.
우선 리듀서는 이전 값과 파라미터만으로 작동해야한다.
그 말은 리듀서 내부에서 랜덤적인 요소가 있으면 안 된다는 것이다.
그렇다면 어떻게 해야할까?
여러가지 방법이 있겠지만 나는 커스텀하게 액션을 생성했다.
자세한 코드는 다음 섹션을 보자
Roll the Dice: Random Numbers in Redux
How would I model calling something like Math.random() in Redux’s world?
daveceddia.com
여기서 소개한 방식은 아니지만 참고했다.
리듀서 (슬라이스) 생성하기
import { createSlice, PayloadAction } from '@reduxjs/toolkit';
import type { RootState } from '../../app/store';

const INITIAL_PROB = 75;
const MAX_PROB = 100;

// Define a type for the slice state
interface CounterState {
  result: boolean[];
  prob: number;
}

// Define the initial state using that type
const initialState: CounterState = {
  // 결과 (최대 10개)
  result: [],
  // 세공 확률
  prob: INITIAL_PROB,
};

export const enchantSlice = createSlice({
  name: 'enchant',
  initialState,
  reducers: {
    execute: (state, action: PayloadAction<number>) => {
      if (state.result.length >= 10) {
        return;
      }

      let success = true;

      if (action.payload < state.prob) {
        // success
        if (state.prob - 10 >= 25) {
          state.prob -= 10;
        }

        success = true;
      } else {
        // fail
        if (state.prob + 10 <= 75) {
          state.prob += 10;
        }

        success = false;
      }

      state.result.push(success);
    },
    reset: state => {
      state.result = [];
      state.prob = INITIAL_PROB;
    },
  },
});

export const { execute, reset } = enchantSlice.actions;

export function executeEnchant(value?: number) {
  let payload = value !== undefined ? value : Math.floor(Math.random() * MAX_PROB);

  if (payload < 0) {
    payload = 0;
  } else if (payload >= MAX_PROB) {
    payload = MAX_PROB - 1;
  }

  return {
    type: 'enchant/execute',
    payload,
  };
}

export const selectEnchantResult = (state: RootState) => state.enchant.result;
export const selectEnchantProb = (state: RootState) => state.enchant.prob;

export default enchantSlice.reducer;src/features/enchant/enchantSlice.ts에 다음과 같이 작성한다.
요약하면 세공하는 'execute'과 초기화하는 'reset'을 추가했다.
그리고 추가적으로 executeEnchant 함수를 export하였다.
이 함수는 값을 전달하면 전달된 값을 포함하는 액션을 반환하고,
전달하지 않으면 랜덤하게 값을 생성한다.
이로써 디버깅과 캡슐화가 가능해졌다.
TypeScript - Hook만들기
우선 왜 만드는지 설명부터 해야겠다.
Redux에서는 dispatch와 Selector로부터 값을 가져오는 Hook을 제공해준다.
(각각 useDispatch, useSelector)
하지만 중요한 점은 이 둘은 Type이 지정되어 있지 않기 때문에,
Intellisense의 도움도 받을 수 없고, Type 체크도 불가능하다.
그래서 타입을 제너릭으로 넣은 새로운 훅을 생성하는 것이다.
import { TypedUseSelectorHook, useDispatch, useSelector } from 'react-redux';
import type { RootState, AppDispatch } from './store';

// Use throughout your app instead of plain `useDispatch` and `useSelector`
export const useAppDispatch = () => useDispatch<AppDispatch>();
export const useAppSelector: TypedUseSelectorHook<RootState> = useSelector;src/app/hooks.ts에 다음과 같이 적는다
Enchant 컴포넌트 만들기
이제 기능을 만들었으니 UI를 만들 차례다.
import { useAppSelector, useAppDispatch } from '../../app/hooks';
import {
  executeEnchant,
  selectEnchantResult,
  selectEnchantProb,
} from './enchantSlice';

export default function Enchant() {
  const dispatch = useAppDispatch();
  const result = useAppSelector(selectEnchantResult);
  const prob = useAppSelector(selectEnchantProb);

  const renderResult = (result: boolean[]) => {
    const elements = [];

    for (let i = 0; i < result.length && i < 10; i++) {
      elements.push(result[i] ? 'O' : 'X');
    }

    for (let i = result.length; i < 10; i++) {
      elements.push('ㅁ');
    }

    return (
      <div>
        {elements.join(' ')}
      </div>
    );
  }

  return (
    <div>
      <div>결과</div>
      {renderResult(result)}
      <div>
        <button onClick={() => dispatch(executeEnchant())}>성공 확률: {prob}%</button>
      </div>
    </div>
  );
}src/features/enchant/Enchant.tsx에 다음과 같이 추가한다.
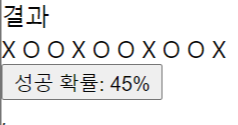
결과를 출력하고, 버튼을 누르면 세공을 하는 컴포넌트가 완성되었다.
컴포넌트 로드
우선 App.js를 다음과 같이 바꿔주도록 하자.
import Enchant from "./features/enchant/Enchant";

function App() {
  return (<Enchant />);
}

export default App;
다음 index.js를 다음과 같이 바꿔주도록 하자.
import React from 'react';
import ReactDOM from 'react-dom';
import './index.css';
import App from './App';
import reportWebVitals from './reportWebVitals';
import store from './app/store';
import { Provider } from 'react-redux';

ReactDOM.render(
  <React.StrictMode>
    <Provider store={store}>
      <App />
    </Provider>,
  </React.StrictMode>,
  document.getElementById('root')
);

// If you want to start measuring performance in your app, pass a function
// to log results (for example: reportWebVitals(console.log))
// or send to an analytics endpoint. Learn more: https://bit.ly/CRA-vitals
reportWebVitals();
Provider와 store을 import한 다음 최상위에 감쌌다.
결과

에 뭐 잘 된다.
깨달은 점
- 우선 리듀서를 순수 함수가 되기 위해,
그리고 디버거블한 코드를 만들기 위한 방법을 고민해 볼 수 있었다.
- 원래 리듀서는 원본을 수정하면 안되지만,
@redux-toolkit의 도움으로 state를 직접 바꾸는 구현이 가능하다.
(Immer처리가 되기 때문에 state를 바꿔도 원본이 바뀌지 않는다.)
- 생각보다 코드가 verbose해져서 별로였다.
- 첫 세팅이라 쓸게 많았는데, 새로운 feature를 추가한다고 하면 간편하게 추가할 수 있을 것 같다.
그래서 중, 대규모 코드에 적합하다고 한 것 같다.
한두개 넣자고 하기에는 초기 세팅이 너무 복잡하다.
- Context와 비교했을 때 Index.js가 단순해지는 효과가 있다.
물론 @redux-toolkit의 slice 덕분이지만,
아무튼 App을 겹겹이 둘러싼 ContextProvider들을 안 봐서 좋았다.
'프론트엔드 > React.js' 카테고리의 다른 글
| Next.js 튜토리얼 (0) | 2022.03.20 |
|---|---|
| React CRA 없는 프로젝트 베이스 (0) | 2022.03.15 |
| Redux 탐험기 (0) | 2021.11.23 |
| React Life Cycle 테스트 (0) | 2021.11.23 |
| React.js의 LifeCycle (with Hooks) (0) | 2021.11.23 |